Welcome to the wandmaking workshop! On this page of the notebook, We'll learn some basic woodworking techniques that you can use to carve your very own wand from wood. Say goodbye to chopsticks and hot glue - this is the real deal.
Level: APPRENTICE | Journeyman | Master - You're learning the basics of wandmaking.
Level: APPRENTICE | Journeyman | Master - You're learning the basics of wandmaking.
(You are reading Part 1. Click here to skip to Part 2.)
SAFETY FIRST: CAUTION!! Woodworking is not a risk-free craft. Because we will be working with sharp knives in close proximity to fingers, this workshop is designed for those 16 years of age and older. Please be responsible for your own safety. The author will not be liable for any injuries you may sustain by following this tutorial. If you follow the safety rules outlined at various points, you will minimize your chances of injury. Disregard them at your own risk.
Without further ado, and keeping safety as our top priority, let's get started!
Part 1A: Introduction to Whittling
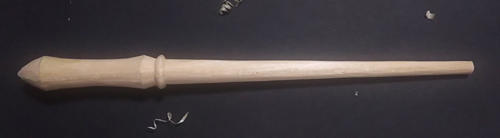
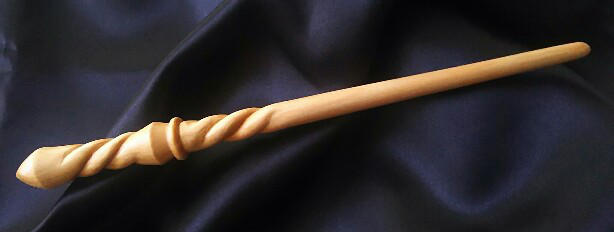 |
| Here's what the finished wand will look like! Pretty cool, huh? |
Tools and Materials
See Figure 1. We will need:
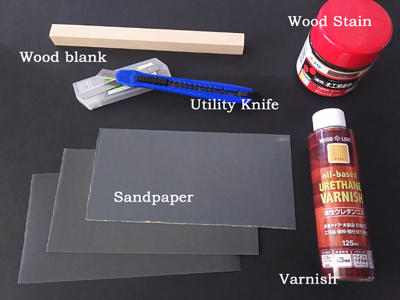 |
| Figure 1 - Tools and Materials are pictured |
- Wood blank: Go to a DIY or craft store and buy a round (or square) dowel, between 5/8” (1.5 cm) and 3/4" (2 cm) in diameter. Soft woods such as pine, balsa, or basswood are best. It is important that you carefully select a piece with straight grain from end to end. Buy enough wood for two wands so you have extra to practice with, and to serve as a back-up in case you mess up later.
- Hand saw (not pictured): You may need a saw to cut a long dowel down to your desired wand length. If you don’t already own one, borrow from a friend or neighbor instead of buying one.
- Utility knife: A simple utility knife or box cutter works best for first-time woodworkers and can be purchased at your local hardware store. Your knife should have a locking mechanism and replaceable blades. A fancy whittling or pocket knife is not required, but if you own one feel free to use it. However, it is your responsibility to sharpen it regularly. Sharpening will not be covered in this workshop. Recommended for experienced woodworkers only.
- Sandpaper: You will need a minimum of three sheets, each one in a different grit. “Grit” is a measure of coarseness. Lower number = coarse, higher number = fine. I recommend something in the ballpark of 150 grit, 320 grit, and 600 grit.
- Wood stain (optional) and Varnish: If you want to color your wand, there are many options available: water-based stain, oil-based stain, gel stain – so many choices! Similarly for varnish, there are many types of finishing material, each with its own pros and cons. These will be covered in part 2.
- Others (not pictured): For safety, you will need something to protect your hands while carving, a dust mask for sanding, and plastic gloves for staining and finishing. You will also need basic tools like pencils and a ruler.
!! SAFETY RULES !!
- Always protect your hands* and respiratory system.
- Always cut AWAY from yourself. Avoid cutting towards yourself if at all possible.
- Always keep your knives sharp and take note of what is in the path of the blade.
Whittling Basics: The “Push Cut” and the “Stop Cut”
Let’s get whittling!First, clean out a well-lit ventilated workspace. Cut your dowel with the hand saw if necessary to make two wand-length blanks. You’ll use one for practice now and save the other one for later (Figure 2).
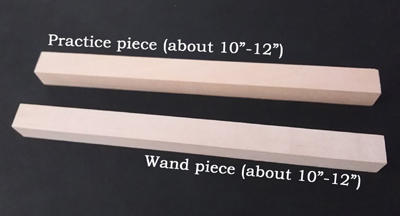 |
| Figure 2 - Prepare two wand-length blanks. |
Got your wand blank? Got your knife? Good – that’s all you need for now. We will start with a simple Push Cut. Hold your knife in your right hand and the blank in your left. (Apologies to lefties – please mirror all L/R directions.)
Extend the blade to about 2 cm and place the edge, facing away from you, against the wood at a shallow angle. Brace the back of the knife with your left thumb and push it forward, guiding the knife with your right hand (Figure 3).
 |
| Figure 3 - Demonstrating the Push Cut |
Did the wood shaving peel away smoothly, or did it get stuck and tear? Tearing occurs when you carve AGAINST the wood grain. For best results, always carve WITH the grain. Your shavings will peel away smoothly (Figure 4).
 |
| Figure 4 - Carving WITH the grain |
To carve the areas that go AGAINST the grain, flip the wood around and carve from the opposite direction. You’ll find that the areas that were AGAINST the grain before are now WITH, and vice versa (Figure 5). By flipping the wood around, you can carve WITH the grain for a stress-free whittling experience.
 |
| Figure 5 - Flip the wood around to avoid tearing. |
Practice the Push Cut until you are confident, and observe how the grain affects the way your shavings peel away. We will use the Push Cut to carve the shaft of the wand and some parts of the handle.
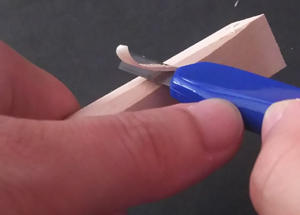
Let’s move on to our second cut: the Stop Cut. Begin by starting to do a Push Cut, but stop before the shaving completely peels away. Disengage the knife, and cut the shaving off from above (Figure 6). This cut will give you a defined edge that we will use for the handle of the wand in Part 1B below, and in Part 2 to carve the details.
 |
| Figure 6 - Demonstrating the Stop Cut |
If at any time you feel your knife doesn’t cut as well as before, change blades (or break off the used section). Once you are comfortable with both the Push and Stop Cuts, you are ready to start carving your wand!
Part 1B: Carving Your Wand's Basic Shape
Step 0: The Wand Design
Experienced woodworkers are encouraged to create their own original design. First-time woodworkers are encouraged to use the design below and follow along with the tutorial. Adjust the proportions of any part of the design to suit your personal taste.Use a pencil to mark out the main sections of the design onto your second dowel (Figure 7).
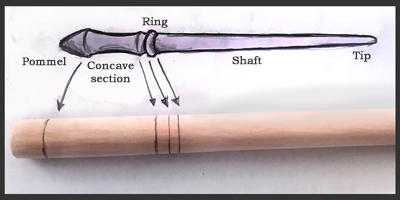 |
| Figure 7: The basic wand design mapped out onto the dowel |
Step 1: Rough-Shaping the Shaft
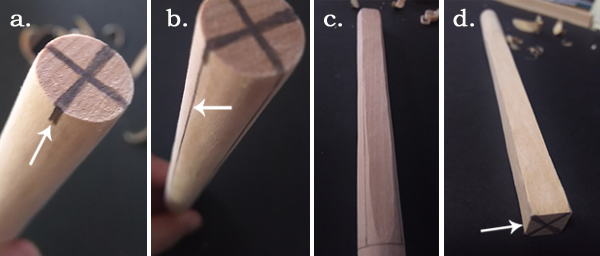
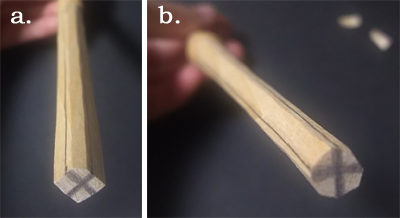
Now that we’ve got a design, let’s get carving. Use the second, untouched dowel you prepared. One of the big challenges of hand-carving wands (as opposed to turning them on a lathe) is carving a straight shaft, without bumps or curves. In order to accomplish this, we’ll use a multi-step process that I developed:First, on the end of the dowel, draw 90° cross-hairs through the center (Figure 8a). Next, use a ruler to extend each cross hair down and parallel to the length of the dowel (Figure 8b), creating guidelines that mark out four faces.
Use the Push Cut to plane down each face (Figure 8c) until you end up with a square cross section (Figure 8d). Remember to flip the wood around if you experience tearing.
 |
| Figure 8: Rough down the shaft by carving along guidelines. |
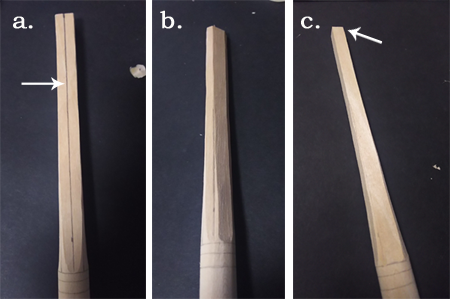
We’ll repeat this to carve the shaft down further. Use your pencil to mark the mid-line of each face, and as before, use the ruler to draw a guide line down the center, along the length of the blank (Figure 9a).
 |
| Figure 9: Repeat to further thin down the wand shaft. |
Push Cut to plane down the corners (Figure 9b) and create a new, smaller square cross section (Figure 9c). You can repeat this process as many times as you like to thin down the shaft to a diameter of your liking. Remember – you can never replace wood once you’ve carved it away. Better to under-do than over-do.
Step 2: Rough-Shaping the Handle
Once most of the shaft’s excess wood has been carved away, we can turn our attention to the handle. Let's start with the main concave section. Use a pencil to mark the boundaries of the curved area. Then, mark the middle where the curve is the deepest (Figure 10). |
| Figure 10: Mark the concave section |
Next, starting from the edges and carving in towards the center, use gentle swooping Push Cuts to gradually create a concave curve down to the middle (Figure 11), remembering to carve WITH the grain as often as possible.
 |
| Figure 11: Carving the concave section |
To do this, your left thumb controls the pressure while your right hand controls the knife angle. At the start of the cut, apply light pressure with your left thumb. As the knife moves towards the middle, your left thumb increases pressure and your right hand maintains the angle between the knife edge and wood.
When the knife reaches the middle, keep the left thumb pressure constant while decreasing the angle. Finally, release your thumb pressure and allow the wood shaving to lift away like a normal Push Cut.
When you’re finished, the handle should look something like this (Figure 12). The general shape of the wand is coming together! Now, let’s move on to defining the handle ring and pommel, and rounding out the shaft.
 |
| Figure 12: Finished carving the concave section |
Step 3: Carving the Handle Ring and Pommel
Let’s start with the ring. From the edge of the concave section, do a Stop Cut to the edge of the ring (Figure 13).
 |
| Figure 13: How to start carving the ring |
Do this all the way around on both sides of the ring: the handle side and the shaft side. When you’re finished, it should look something like Figure 14a. Next, shave down the edges of the ring to round it out (Figure 14b).
Repeat these steps (Stop Cut to ring edge, then Push Cut to round it out) until you are happy with the depth and size of the ring.
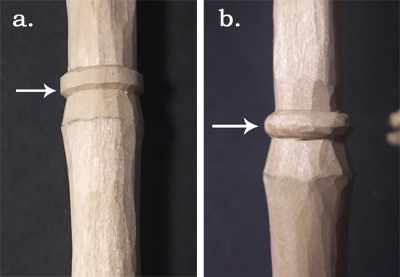 |
| Figure 14: Rounding out the ring |
Now we’ll move on to the pommel. On the end of the dowel, mark the center with a pencil. Use the Push Cut to carve from the edge of the concave section towards the center until you reach the pencil mark you made. Repeat all the way around until the pommel becomes pointed (Figure 15).
 |
| Figure 15: How to carve the pommel |
You may end up carving against the grain here, and that’s ok.
Congratulations! The handle’s basic shape is complete.
Step 4: Rounding Out the Shaft
In this step, we will turn our shaft’s square cross section into a circle. First, draw a guideline down each face as before. This time however, when you use your Push Cut to plane the faces down, do NOT plane down far enough to touch your guidelines (Figure 16a).
The goal is to make an octagonal cross section instead of a square one (Figure 16b). Remember to flip the wood around if you experience tearing.
 |
| Figure 16: Create an octagonal cross-section |
From here, shave down each corner until your cross-section is round (Figure 17). The key to this kind of carving is long, light cuts. Maintain a shallow blade angle with your right hand and keep the left thumb pressure consistent.
 |
| Figure 17: Use long, light cuts to shave down the corners |
Step back and admire your work so far! You should now have in your hands something that looks like a wand. Hopefully you’ve picked up on how the simple Push and Stop Cuts can be used in combination to whittle a variety of shapes. We’ll continue in Part 2, and give our wands a bit of personality and detail.
This is a wonderful step by step guide Maranda! Thank you for the info & safety instructions! Cannot wait to give it a try :)
ReplyDeleteI'd love to see how it turns out!
DeleteI am so profoundly elated you're doing this blog Maranda. You are my favorite wand designer and (if you remember our email conversation some time ago) trying this on an oak dowel was not the best decision.
ReplyDeleteGlad you enjoy it! I remember - Oak is definitely not a wood to start out with, but it looks like you figured that out for yourself. Sometimes, that's the best way to learn!
Deletethis is a great turtorial
DeleteThis is utterly fantastic! I am a huge fan of your work and when I can earn enough money I would love to place an order with you, your work is inspiring and has started me on my own journey into wand making!
ReplyDeleteOne would probably benefit quite a bit from a wide wood chisel as well (especially if they're insane like me and use the whole branch).
ReplyDeleteI am interested in wood carving, and I picked up a stick from a camp that I went to recently, so I wanted to make something out of it that had a use. I am definitely going to use this tutorial, thank you!
ReplyDeleteGreat articles. What do you think of using boiled linseed oil and prepared beeswax as a finish? (I've posted this twice now but can't find my first post, sorry for repetition.)
ReplyDelete