Welcome back to the Wandmaking Workshop! On this page of the notebook, we'll continue from where we left off in Part 1 and continue to carve our own wand from wood.
Level: APPRENTICE | Journeyman | Master - You're learning the basics of wandmaking.
 |
Part 2A: Carving the Details
In Part 1, we practiced some simple whittling cuts and used those cuts to carve the basic shape of the wand. Now, in Part 2, we’ll refine the design by carving the details before moving on to sanding, staining, and finishing.
SAFETY FIRST: CAUTION!! Woodworking is not a risk-free craft. Because we will be working with sharp knives in close proximity to fingers, this workshop is designed for those 16 years of age and older. Please be responsible for your own safety. The author will not be liable for any injuries you may sustain by following this tutorial. If you follow the safety rules outlined at various points, you will minimize your chances of injury. Disregard them at your own risk.
Let's review these safety rules from part 1:
- Always protect your hands* and respiratory system.
- Always cut AWAY from yourself. Avoid cutting towards yourself if at all possible.
- Always keep your knives sharp and take note of what is in the path of the blade.
The Wand Design – Revisited
 |
| Figure 18: Two variations on the base design |
NOTE: Both variations have spiral design elements. For an easier time, right-handed folks should carve a spiral that ascends up-right (as shown in figure 18) while left-handed folks should carve a spiral that ascends up-left (mirrored).
Variation 1: Spiral Groove
With your knife, make mini Stop Cuts resembling a “V” that end on the pencil line (Figure 19).
 |
| Figure 19: Carve a spiral groove by doing small Stop Cuts |
Do this for the entire length of the spiral groove. Repeat to increase the depth of the groove until you are satisfied.
For Variation 1, that’s all you need! To further personalize your design, change the width of the groove by starting your cut further away from the pencil line, make a double (or triple!) groove by carving more lines next to the first, or try a cross-hatching effect by carving a groove in the opposite direction.
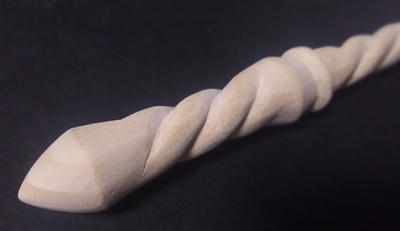
Variation 2: Spiral Twist
 |
| Figure 20: Carve the spiral twist by rounding out the grooves |
At the start of the cut, use little pressure with your left thumb and maintain a shallow blade angle. Increase pressure and blade angle as the cut continues, until the blade naturally stops in the groove.
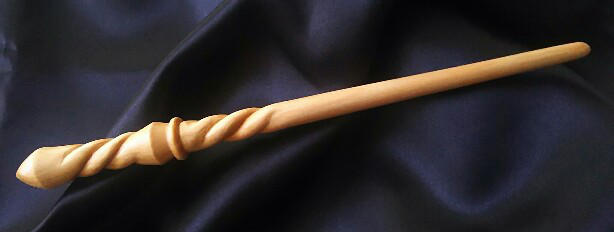
You can use these techniques to create your own variations or add detail anywhere on the handle, shaft, or both. When you are satisfied with what you’ve created, move on to Part 2B below to add the finishing touches!
Part 2B: Finishing Your Wand
All your hard work is about to pay off here, where we’ll we will sand, stain, and add a finish coat to the wand for a final result you’ll be proud to show off.
We will no longer be working with knives, but there are some new important safety rules to follow:
- Work in a well-ventilated area. Sanding creates sawdust, and some stains have fumes.
- Protect your respiratory system by using a dust mask, and protect your hands with gloves.
- Some stains are flammable. Keep away from open flames.
Sanding
TIP: If you want to leave knife marks on some areas of your wand for texture, don't sand those areas.
You will need at least three different “grits” (a measure of coarseness) of sandpaper, with lower numbers being coarser than high numbers. Start with your lowest grit (120, 150, or 180 work well) and cut out a piece about as big as your palm. Start standing with the grain (Figure 21).
 |
| Figure 21: How to sand with the grain |
Apply pressure so the abrasive material of the sandpaper cuts into the wood, removing your knife marks. Sand all areas of your wand thoroughly. For some parts of the handle, sanding with the grain isn’t possible due to the small surface area. In this case, first sand at a 45° angle, than again at a 45° angle in the opposite direction.
When you are finished with your lower grit paper, move on to your next highest grit (between 220 and 360 grit). Do not skip grits! Again, sand the entire wand thoroughly. Our goal is to remove all the scratch marks caused by the rough lower grit abrasive.
Finally, sand one more time with your high grit paper (400-600 grit) to bring your wand to a smooth finish (Figure 22).
|
| Figure 22: Use sandpaper to smooth out the wand surface. |
Wipe off any lingering sawdust with a paper towel or rag before moving on to stain and varnish.
OPTION: For those who don’t want to use varnish and instead prefer the feel of natural wood, sand once more with a superfine grit like 800, 1000, or 2000 for a shiny and smooth surface. Be warned - without a finish coat, the oil and sweat from your hands will wear on the wand much faster, and you'll need to re-sand again in the future.
Wood Stain 101
Wood stain comes in a wide variety of brands and types. In general, stain consists of pigments or colorants suspended in a solvent such as water, oil, or even in a finishing material like polyurethane. Contrary to paint (which sits on top of the wood), stain is absorbed by the wood, adding color without covering up the beauty of the grain.
However, because wood is a natural, organic material with many differences between species, as well as between different parts on the same piece of wood, stains may not be absorbed uniformly, causing variations in color intensity that are not present with paint. For example, end grain will absorb more stain than face grain, and the resulting color will be darker. Birch stained with darker colors tends to turn out blotchy while the same stain will be uniformly absorbed by cherry, creating a rich color. The only way to learn what will happen with any given stain and wood is to experiment.
Staining Your Wand (optional)
IMPORTANT: Read and follow all instructions printed on the stain can or packaging. Each brand is slightly different, and the information presented here might not apply to every brand. If you still unsure, there are often resources on the manufacturer's website. Do your own research if necessary.
There are two basic types of stain: oil-based stain and water-based stain. Oil stains use mineral spirits as the solvent and are the most common type (Figure 23a). These tend to have fumes and are flammable, so be careful when using them.
In contrast, water-based stains use water as a solvent (Figure 23b). These are more difficult to use because they dry quickly and can raise the wood grain, making the surface “fuzzy.” Unlike oil stains, water-based stains don’t have dangerous fumes or messy clean-up. (RECOMMENDED FOR BEGINNERS)
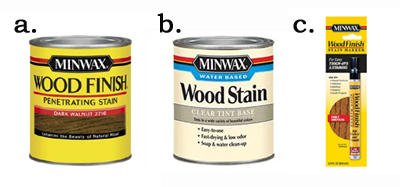 |
| Figure 23: Wood stain examples. Image Source: www.minwax.com |
To use stain from a can, first stir thoroughly to mix the pigments and the solvent. Wet a paper towel or rag with a generous amount of stain and rub it into the wood (wear gloves - stain the wood, not your hands!). Give it a minute or two to absorb, then wipe off the excess.
If you don’t own any stain, buying a whole can just for this project is unnecessary and wasteful. Luckily, many brands make stain pens intended for furniture touch-up and the like (Figure 23c). If you are new to woodworking, this is a good way to easily add color to your wand without dealing with a the hassle and mess of a whole can. Once you have finished staining your wand, allow it to dry thoroughly.
This introduction to stain has barely scratched the surface of what is out there. Those interested in exploring woodworking further are encouraged to ask questions and to do their own research.
Varnishing Your Wand
Adding a finish coat is the final step before your wand is complete. This seals in the stain (if you used it) and protects the wood surface. Like stain, there are many different types of finish coats, such as polyurethane, lacquer, varnish, and shellac. Covering all of these is beyond the scope of this tutorial, so we will use varnish, one of the most basic types.
Ideally, you will finish your wand with an oil-based varnish if you used oil-based stain, and with a water-based varnish if you used water-based stain. (However, if you allow your stain to dry completely before varnishing, it doesn’t really matter what kind you use.)
The most easily obtainable varnish for first-time woodworkers is likely to be acrylic varnish, found in the paint aisle of your local craft store (Figure 24a). To apply, brush a thin coat onto the surface of your wand and allow it to dry. Other types of varnish include oil-based wiping varnish (Figure 24b), which are applied with a rag in the same way as stain. You may also find polyurethane in DIY stores, which can also be brushed on (Figure 24c).
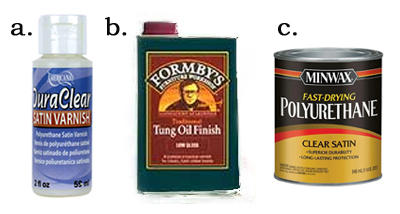 |
| Figure 24: Varnish examples. Image Sources: DecoArt, Formby's, Minwax |
IMPORTANT: Read and follow all directions printed on your varnish's packaging. The information presented here may not apply to all brands. Consult the manufacturer's website for more resources.
TIP: You may need to work in sections: varnish the shaft while holding the handle, and once it dries, hold the shaft and varnish the handle.
Varnishes come in a variety of finishes such as matte, satin, and gloss. Choose whatever is available and suits your taste. Apply one thin coat at a time and allow it to dry in between coats. An acrylic varnish might need only one or two coats, while a thinner oil varnish may need 5 or more.
Use your judgment and stop when you feel the wood is adequately protected, then allow the varnish to cure completely. You will know when it's ready when the wand doesn't feel sticky at all. Check the packaging for the approximate drying times.
You’re all done!
Congratulations! You made it through the entire workshop and now have in your hands a wand that you carved, sanded, and finished on your own. Hopefully this series of tutorials has given you a hands-on glimpse into the wide world of woodworking. Enjoy your new wand, and I'll see you on the next page of the notebook!
– Maranda
< Go back to Part 1
Thank you for this wonderful information!! I’m just starting out and trying to learn techniques. This is perfect
ReplyDelete